
Pages
- NodeTools: Node.JS Stack
- Quick Start To NodeTools
- TrapCSS: NodeTools Tutorial
- TrapCSS 2: Advanced NodeTools
- Web Development With NodeTools
- Babel: When Open Source Is Not Free Sofware
- Discussion for NodeTools
Stack
Web Software
Misc
NodeTools Quick Start
NodeTools is a full Node.JS stack which includes a number of packages for organising, testing, documenting and typing packages with JSDoc. It's very small (10 new dirs in TOTAL) and contains tools for essential operation of a package house. Dependencies that it installs provide an up-to-date development environment for local JavaScript development. It was created by a professional Node.JS development company in London to meet modern requirements for bespoke and agile Node.JS development process. This guide will show how to start using the stack. If you have any questions, please refer to the Getting Help section. Be sure to subscribe to updates via the web-push button on the left, or email newsletter to be notified of new features first.

Install MNP
The best way to start using NodeTools, is via MNP1.1.8 (My New Package) — a GitHub template-based package bootstrapper that allows to generate new repositories from templates and fill in the preset information into them. mnp has only 3 small dependencies and can be installed globally:
yarn add global mnp
npm i -g mnp
After it's first been installed on the system, it needs to be configured with a global settings file in the home directory. Such settings can then be updated for any other organisational directories, but in general most of the properties will stay the same. To begin the configuration process, navigate to the home dir via terminal (cd ~) and call mnp --init.
But first, a personal access token needs to be generated for GitHub that will allow to access GitHub API. The delete_repo and repo permissions are needed to create new repositories and delete them from the CLI.GitHub access token: -new-access-token- # generated token
GitHub organisation: nodetools # either organisation or user login
npm scope: nodetools # optional scope for packages
Default Template: [mnpjs/package] # default template in org/name format
user: [Anton] # the name for package.json, read from git config
email: [anton@adc.sh] # the email for package.json, read from git config
Website (for readme): https://www.art-deco.github.io/nodetools # link to website
Trademark (for readme): NodeTools # name in footer
Legal name (for license): Art Deco Code Limited # full business name
Package Manager (yarn/npm): [yarn] # which package managerThese settings will be stored in the ~/.mnprc file and read by MNP upon each execution.

Configure Org
Packages should be organised by organisations, which can be created for free on GitHub in unlimited number. Using personal repositories is also possible, in which case the name of the organisation is assumed to be the username. We'll create a new org folder in the home dir, and navigate into it:
mkdir cool-org
cd cool-org
Here, we can run mnp --init again to update the settings for that particular org, however all the standard settings will be filled in already from the ones we wrote to the home directory.
GitHub access token: [8cb0f088cba5929dcd2337f906a9d8eca81d6759] # keep token
GitHub organisation: [nodetools] cool-org # update org
npm scope: [nodetools] cool-org # update scope
Default Template: [mnpjs/package] # keep default
user: [Anton] # keep
email: [anton@adc.sh] # keep
Website (for readme): [https://www.art-deco.github.io/nodetools] https://cool-org.com
Trademark (for readme): [NodeTools] Cool Org
Legal name (for license): [Art Deco Code Limited] # keep
Package Manager (yarn/npm): [yarn] # keep
After doing this, another .mnprc will be created in the cool-org folder, and these settings will be used for projects created in that organisation.
After MNP is configured, we can proceed to creating a new package.

Spawn Package
To create new packages from the default advanced NodeTools package template, we'll simply call mnp in the cool-org directory. The package bootstrapper will ask us some questions, after which we'll have a new package folder ready for development.
Package name: example-package # enter package name
# @artdeco/example-package
Description: An example package created with MNP.
Generating repository...
Starring...
⭐️ Created and starred a new repository
https://github.com/artdecocode/example-package
Cloning into '/Users/zavr/cool-org/example-package'...
With binary [y/n]: [y]
Build or compile: [compile]
Choose a license (e.g., agpl-3.0, apache-2.0, bsd-3-clause, gpl-3.0, mit, custom)
See full list at https://github.com/mnpjs/licenses
License: [agpl-3.0]
Init Github Wiki [y/n]: [y]
Homepage: [https://github.com/artdecocode/example-package#readme]
Keywords (e.g., artdecocode, example-package): example, mnp
Please go to https://github.com/artdecocode/example-package/wiki/_new
to create the first page and press enter when done. (y/n): [y]
Cloning into '/Users/zavr/cool-org/example-package/wiki.git'...
Settings topics...
yarn install v1.13.0
[1/4] 🔍  Resolving packages...
[2/4] 🚚  Fetching packages...
[3/4] 🔗  Linking dependencies...
warning " > depack@1.0.1" has unmet peer dependency "google-closure-compiler-java@*".
[4/4] 🔨  Building fresh packages...
✨  Done in 2.70s.
Initialised package structure, pushing...
Created a new package: @artdeco/example-package.Google Closure Compiler Java
The > depack@1.1.0 has unmet peer dependency "google-closure-compiler-java@*". warning is shown because Depack relies on Closure Compiler which should be installed as a package in the home dir, rather than inside of each new package individually. Unfortunately, neither yarn nor npm look up for the presence of this dependency locally, despite the fact that Node will traverse all dirs up to root (/Users/user/org/package, /Users/user/org, /Users/user, /Users and /) to find dependencies there. To skip installing a compiler into each new package, we simply install it in ~:
cd ~
yarn init # simple init
yarn add google-closure-compiler-java
The compiler is recommended as it's one of the coolest features of the NodeTools stack.
So in less than a minute, we're ready to write code, document and test our new package. Let's discuss some questions asked by MNP further.

Binary
MNP asked us if we want to create a binary. Binaries are great for DevOps to write scripts in Node.JS. Any system that has Node installed will be able to run those binaries. Even if a library was created first without a binary, it can be added later manually (by bootstrapping a new package and copying src/bin dir and scripts in package.json from there. We're working on the patch functionality of MNP that would allow to do that automatically).
Packages created with binaries can be executed from the command line. The source code for executable logic is placed into the src/bin folder and contains a number of files:bin/index.js
This is the entry file for the development purposes. It's not used when the package is published. It only calls the ÀLaMode handler to transpile source files on the fly, allowing to rename imports into require calls. It is also used when testing the package.
#!/usr/bin/env node
require('alamode')()
require('./mnp')
Additionally, the package.json will contain a number of records in the "bin" property:
{
  "bin": {
    "example-package": "compile/bin/example-package.js",
    "example-package-dev": "src/bin/index.js"
  },
  "files": [
    "...files",
    "src/bin/index.js"
  ]
}
These aliases can then be called from anywhere on the system, if the package was installed globally, or via yarn example-package in other local packages that installed the binary. The example-package-dev binary record is used to call the binary from the local filesystem after it's been linked with yarn link command in the project folder. For example, you might want to go to another package folder, and execute binary from there using the example-package-dev command that will run the binary source code. This eliminates the need to build/compile the binary after each change, during the local development process while testing code on other packages. The files property will also include the pointer to the src/bin/index.js otherwise NPM would throw an error when trying to install our package.
bin/example-package.js
This is the actual binary logic that will be executed. Commands can be separated by placing them into the commands directory, and then importing them from this file. We'll need to import args and the usage library that have been optimised for the use with Closure Compiler.
import { _help, _init, _output, _version,
  _input, argsConfig } from './get-args'
import { reduceUsage } from 'argufy'
import usually from 'usually'

if (_help) {
  const usage = usually({
    description: 'An example package created with MNP.',
    example: 'example-package example.txt -o out.txt',
    line: 'example-package input [-o output] [-ihv]',
    usage: reduceUsage(argsConfig),
  })
  console.log(usage)
  process.exit(0)
} else if (_version) {
  console.log(require('../../package.json').version)
  process.exit(0)
}
get-args.js
The arguments are generated using the argufy package that has been specifically developed to be compatible with Closure Compiler. All flags that are passed to binary via the process.argv property will be parsed and made available for export from this file. They are exported with _ (underscore) to avoid errors when passing variables around. The arguments are generated from the types/arguments.xml file that describes possible flags and their types:
<arguments>
  <arg command name="input">
    The path to the input file.
  </arg>
  <arg name="output" short="o" default="-">
    Where to save the output. By default prints to stdout.
  </arg>
  <arg boolean name="init" short="i">
    Initialise in the current folder.
  </arg>
  <arg boolean name="help" short="h">
    Print the help information and exit.
  </arg>
  <arg boolean name="version" short="v">
    Show the version's number and exit.
  </arg>
</arguments>
When a change is made to the file, the yarn args command need to be run to update the get-args file automatically via argufy. Moreover, the reduceUsage command is imported from argufy package also to generate help information that can be passed to usually package to display usage info to users with -h option.
Furthermore, it is possible to separate arguments by functionality by creating multiple arguments.xml files, like it's been done in Expensive and Logarithm packages, however the template does not use this method. Refer to the source code of these 2 package to see how their arguments are implemented.When developing binary locally, it can be executed with the yarn dev -arg value -arg2 command. It will start a new Node process and run src/bin/index that will transpile the source-code on-the-fly. When it comes to compilation, the source code will either be transpiled into the build folder using ÀLaMode by simply renaming imports and exports, or into the compile folder by executing Closure Compiler via Depack. By compiling a binary, its dependencies will all be merged into a single JS file, which will reduce the number of prod dependencies to 0. This is discussed next.

Using Compiler
One of advantages for the stack is its ability to properly compile Node.JS packages with Closure Compiler. Initially, before such option was possible, we used to just transpile packages and put their source code into the build folder. This is still possible, however it is now recommended to either compile the full package, or compile its dependencies into StdLib and build the source code. In both cases, the number of dependencies can be reduced to 0 which makes packages more appealing to users. This section shows how to use the compiler.
Compilation
Next, MNP asked us if we wanted to build or compile packages. By default, the compilation method is chosen. Packages that will participate in compilation need to be adapted to the Compiler to avoid warnings, and have externs. An extern is a file that contains information about types in a program, such as its config. Without an extern, the advanced compilation is not possible, since the compiler renames property names on objects, so that our API contract would be broken. This means that we're not only feeding JS files to the compiler, but also maintaining a coherent structure for such process, and it's the purpose of NodeTools to provide tools for that.
Moreover, the compiler removes JSDoc comments by default, but we want to annotate our API so that it's 100% usable for developers who will consume our package. Therefore, there are 2 types of types:- API types that describe methods in the package, found in types/api.xml, and
- Record/interfaces types that describe data structures, found in types/index.xml file.
The API contract is used to describe methods in the package using XML:
<types namespace="_examplePackage">
  <method name="examplePackage" async return="string">
    <arg type="!_examplePackage.Config" name="config">The config.</arg>
    An example package created with MNP.
  </method>
</types>
Using this data from the XML, we will then enrich our template (compile/template.js) file that is then used to generate the entry point to the package (compile/index.js) using the yarn template command.
const { _examplePackage } = require('./example-package')

/**
 * @methodType {_examplePackage.examplePackage}
 */
function examplePackage(config) {
  return _examplePackage(config)
}

module.exports = examplePackage

/* typal types/index.xml namespace */
The template requires the _examplePackage named export from the ./example-package file which is the actual compiled source code that includes all dependencies. In our example, it's quite simple:
'use strict';
const c={black:30,red:31,green:32,yellow:33,blue:34,magenta:35,cyan:36,white:37,grey:90};module.exports={_examplePackage:async function(a={}){const {shouldRun:d=!0,text:b=""}=a;if(!d)return"";a=(a=c.yellow)?`\x1b[${a}m${b}\x1b[0m`:b;console.log("@artdeco/example-package called with %s",a);return b}};

//# sourceMappingURL=example-package.js.map
The entry point that we passed to the compiler was src/depack.js.
import '../types/externs'
import examplePackage from './'

module.exports = {
  '_examplePackage': examplePackage,
}
As you can see, we imported our externs from types and an API method from the source code. Importing externs is required to preserve the property names of the config, otherwise anyone who tries to use our package will pass properties from the config, but the program will not do anything as they will be renamed into properties like .a, .b, etc. The src/depack.js file is only used by the compiler to create the compile/example-package.js source code that is then required by compile/index.js — the entry point to the package ({ "main": "compile/index.js" } in package.json). Our template then wraps the imported function with its own function, and annotates it with @methodType {_examplePackage.examplePackage}. When we call yarn template, Typal will find our method type from types, and place the correct JSDoc into the final JS.
const { _examplePackage } = require('./example-package')

/**
 * An example package created with MNP.
 * @param {!_examplePackage.Config} config Options for the program.
 * @param {boolean} [config.shouldRun=true] A boolean option. Default `true`.
 * @param {string} [config.text] A text to return.
 * @return {Promise<string>}
 */
function examplePackage(config) {
  return _examplePackage(config)
}

module.exports = examplePackage

/* typal types/index.xml namespace */
/**
 * @typedef {_examplePackage.Config} Config `@record` Options for the program.
 * @typedef {Object} _examplePackage.Config `@record` Options for the program.
 * @prop {boolean} [shouldRun=true] A boolean option. Default `true`.
 * @prop {string} [text] A text to return.
 */
The config type is also added in the entry point so that it's accessible to the VSCode engine when the package is required, and we get perfect developer experience when consuming this package. Therefore, the purpose of the template file, is to wrap the source code exported by Closure into a developer-friendly function, which is then decordated with JSDoc during templating by Typal. This allows to move away from TypeScript to pure JSDoc, and maintain types from XML files instead of having to updated them in different places.
This method of the API is also placed in the types/index.js which is used for development purposes only.export {}
/* typal types/api.xml namespace */
/**
* @typedef {_examplePackage.examplePackage} examplePackage An example package created with MNP.
* @typedef {(config: !_examplePackage.Config) => string} _examplePackage.examplePackage An example package created with MNP.
*/
/**
* @typedef {import('..').Config} _examplePackage.Config
*/In there, we call export {} so that VSCode is able to export types from it. We then use the typal marker so that the typedef for the method can be generated. Finally, we manually import the config from the package's entry. What is the purpose of this method type? It is so that we can use it in our source code for development purposes:
// src/index.js
import { c } from 'erte'

/**
 * @type {_examplePackage.examplePackage}
 */
export default async function examplePackage(config = {}) {
  const {
    shouldRun = true,
    text = '',
  } = config
  if (!shouldRun) return ''
  console.log('@artdeco/example-package called with %s', c(text, 'yellow'))
  return text
}

/**
 * @suppress {nonStandardJsDocs}
 * @typedef {import('../types').examplePackage} _examplePackage.examplePackage
 */
See how the method is not annotated with JSDoc itself, but only its type is given. This allows us to receive access to the config type by importing the actual function type, and validate types during the compilation process. This point is quite important as it means that we don't annotate code in the source code itself, but in XML files which are used as the single source of truth to:
- Enrich functions from templates with automatic @param annotations;
- for development to access auto-completions by importing methods' typedefs;
- during the compilation for type checking.
The @suppress comment is needed as Closure Compiler does not understand the import directive in typedefs. Each new typedef import needs its own separate block with @suppress command.
The types are placed in externs that were imported by src/depack.js, so that the Compiler will see @type {_examplePackage.examplePackage} annotation in source, and will be able to match it against the type from extern. Types from types/index.js or compile/index.js are NOT used in compilation. They are written in a JSDoc format not understood by Closure, but recognised by VSCode (such as arrow functions notation that provide better experience)./**
* @fileoverview
* @externs
*/
/* typal types/index.xml externs */
/** @const */
var _examplePackage = {}
/**
* Options for the program.
* @record
*/
_examplePackage.Config
/**
* A boolean option. Default `true`.
* @type {boolean|undefined}
*/
_examplePackage.Config.prototype.shouldRun
/**
* A text to return.
* @type {string|undefined}
*/
_examplePackage.Config.prototype.text
/* typal types/api.xml externs */
/**
* An example package created with MNP.
* @typedef {function(!_examplePackage.Config): !Promise<string>}
*/
_examplePackage.examplePackage
The types for externs have to be in a different format to standard VSCode JSDoc, because Closure has got its own parser. Typal accounts for that and generates externs in the suitable format. The @fileoverview/@externs comments at the top are needed so that the externs file can be simply imported from the source code. Otherwise, it would have to be passed on to depack via the --externs types/externs.js command, but it's more intuitive to just import them. On top of that, the exters file is also published and a record in package.json points to its location:
{
  "files": [
    "types/externs.js"
  ],
  "externs": "types/externs.js"
}
The externs field is looked up by Depack when we incorporate packages in other packages. For example, when our example-package is actually consumed by another software, its types need to be preserved for the compiler, therefore we also publish our externs to facilitate integration into other packages. This is the essence of the compilation process. You can read more documentation on the Depack1.1.2 page and its wiki that also outlines whether you can use modules compiled with Babel and CommonJS modules in the process, but for the best results, make sure that packages that are imported in compiled software, also follow NodeTools conventions, such as providing externs and proper Closure Compiler annotations.
Finally, if it's required to preserve require statement, it's possible to add a simple comment before the package name. If a named export is being required, its name should be put in quotes to prevent the renaming of the property like so:const { 'a': a } = require(/* dpck */'package')
// could ^ use destructuring but there's a bug in
// Jan 2020 version of the compiler, so:
const example = require(/* dpck */'package')
const a = example['a']
// invoke
console.log(a({ 'configItem': 'test' }))Adding a comment in require will exclude required file from static analysis and from being added to Closure's compilation stack as require() will be treated as dynamic call, i.e. the dependency will be linked dynamically rather than statically. This is useful when dependencies have not been adapted for use with Closure, however in that case, when passing config properties, they also need to be quoted, otherwise the compiler will rename them.
Overall, just remember that advanced compilation changes property names, therefore we need externs. This is also true for external data such as JSON data received from HTTP API requests. We need to either provide externs, or quote properties to prevent mangling.Above, we talked about compiling libraries so that they can be required by other packages. The script is called lib and can be run using yarn lib. To compile a binary, we call yarn bin that will generate an executable JS file, add a shebang to it, and set executable permissions on it.

Building (Transpilation)
Instead of transpiling packages, it's possible to just build them, which means renaming imports and exports into require calls and module.export assignments. This is a simpler strategy but it's rarely used. The main time when we want to build packages, is for larger projects that also might include JSX components and more complex structures. For example, if we use __dirname in source code a lot, this variable will be different when compiled, therefore we might want to avoid having to worry about paths being the same. Our transpiler is regex-based and simply looks for import .../ export ... statements without building ASTs which is faster, but might be less reliable. Refer to ÀLaMode3.5.2 documentation to find out about some edge cases when the transpiler might fail. If it happens, try rearranging exported functions' positions, or placing them in separate files.
ÀLaMode Modules
Because of Babel and TypeScript, it's become a standard for transpiled packages to add the __esModule: true export and export the default function in the .default property of the module object. This is not the case with ÀLaMode, which simply assigns the default export to module, and assigns named exports as its properties. The __esModule is not used at all:
import def from 'package'
// let def = require('package'); if (def && def.__esModule) def = def.default

export default class Example {}
// => module.exports = class Example {}
export const test = 'hello'
// => module.exports.test = 'hello'
There's absolutely no change to code apart from imports so that it still looks nice. But because of the __esModule flag, some packages transpiled with Babel/TypeScript will require the additional check when importing them. When we know that the imported packages can skip this check (if they were also made with NodeTools), we can add them to the alamodeModules field in the .alamoderc.json configuration file:
{
  "env": {
    "build": {
      "import": {
        "alamodeModules": ["argufy", "indicatrix",
          "usually", "erte"]
      }
    }
  }
}
This will remove the check when transpiling those packages. We can also set the alamode field to true on the actual package itself it its package.json, so that all other packages that consume it will known that it's an ÀLaMode module that doesn't require the __esModule check (same works for packages written in CommonJS natively without transpilation step).

StdLib
As discussed above, we might not want to compile packages every time. Examples of larger projects that don't compile code are Documentary and Splendid. Because these pieces of software are finished products in themselves, and will not be used as libraries for incorporation into other packages, they can be built without advanced compilation that would require annotating everything everywhere. But to avoid having lots of dependencies that come with them and just form a library for the software product, we can create an stdlib file that will require all dependencies, and compile them. Then, the source code will be updated to require methods from the stdlib instead of actual packages.
// src/stdlib.js
import { c } from 'erte'
import argufy, { reduceUsage } from 'argufy'
import usually from 'usually'
import indicatrix from 'indicatrix'

module.exports = {
  'c': c,
  'reduceUsage': reduceUsage,
  'argufy': argufy,
  'usually': usually,
  'indicatrix': indicatrix,
}
The package's standard library imports methods from dependencies, and exports them using module.export assignment. The names of named and default imports must be consistent across source files together with stdlib.js file. The stdlib job from package.json is then used to put their source code together and produce a singe JS file:
{
  "stdlib": "depack src/stdlib.js -o stdlib/index.js -a -c -p --source_map_include_content",
  "b": "ALAMODE_ENV=build alamode src -o build -i stdlib.js -s"
}
The arguments used for complation are -a for advanced mode, -c to indicated we're compiling a Node.JS package rather than producing a web-bundle, which Depack is also capable of doing, and -p means pretty code. Source map will also be generated and put in the same directory, so that when debugging, we'll see the source code (however we won't be able to hover over variable names as VSCode doesn't map symbols). The build command sets the ALAMODE_ENV environment variable to build which is used by .alamoderc.json file during the build stage:
{
  "env": {
    "build": {
      "import": {
        "stdlib": {
          "path": "stdlib",
          "packages": [
            "argufy", "indicatrix",
            "usually", "erte"
          ]
        }
      }
    }
  }
}
Such configuration tells the transpiler when running on the build environment to apply the stdlib config, such as that the location of the stdlib is pointing to the stdlib dir, while 4 dependencies are being renamed. Each new dependency that is added to the StdLib also needs to be specified in the packages field otherwise it won't be transpiled. When building the package with the yarn b command (short for build), the transpiler will rename symbols to require methods from stdlib. This is why the names must be consistent.
const { reduceUsage } = require('../../stdlib');
const { usually } = require('../../stdlib');
const { c } = require('../../stdlib');
const { indicatrix } = require('../../../stdlib');
This strategy is convenient for merging all dependencies suitable for compilation into a single JS file, which is used in a big piece of software. However, this is not recommended usage for libraries that can be compiled into other packages, as it does not allow to make sure that the library's own source won't produce any compiler warnings and errors during compilation.

Automation of Documentation
The core value of NodeTools is automation, especially when it comes to documentation. To be able to embed output of programs together with their source code automatically, without having to copy-paste them by hand, was the initial requirement for the documentation engine called Documentary. When types and JSX transpilation were added, it became possible to construct markdown tables for types and use custom JSX components also. The documentation engine is started with the -d flag that produces a verbose logging output, otherwise it's not visible what Documentary is doing.
Documentation is placed in the documentary folder, where sections are split by files and folders. They are then compiled into the README.md file that gets published to GitHub and NPM. There are 2 special cases for files in each folder: index.md and footer.md which will be compiled first and last in that folder. Other files are read using alpha-numerical order, e.g., 1-example.md, 2-test.md and so on. There are certain markers and components that can be used to invoke documentation features, including:- %NPM example-package%: the NPM badge
- %TOC%: the table of contents
- %EXAMPLE: example, ../src => @artdeco/example-package%: the examples, with renaming of source imports
- %FORK example%: the output of programs
- <typedef method="examplePackage">types/api.xml</typedef>: to generate API method headings
- <typedef>types/index.xml</typedef>: to generate types' information (configs, interfaces)
When forking programs, Documentary automatically invokes the ÀLaMode transpiler so that the source code can be forked natively. In addition, cache will be maintained in the .documentary/cache folder for forks, so that if a script and its dependency tree didn't get modified, the output is taken from cache to save valuable time. Fork marker can also be changed to a fork component (<fork>) that provides a way to pass environment variables. Additional information is available from the Wiki page.
The power of examples lies in the ability to execute them from documentation, which provides an additional quality assurance mechanics. This means that we don't even have to write tests for simplest use-cases, as when the README is compiled, we'll be able to visually see if the program is working. It's great for making sure that functionality that we advertise actually works. Any time a change to the package is made, it will be reflected in the examples' output so that we know we didn't accidentally break the advertised API contract with new code. Although such regression testing cannot 100% substitute proper unit and integration tests with edge cases, it can help us make sure that the program remains correct through versions.JSX Components
Another cool feature is the ability to write our own components that could be invoked in documentation. The template used already has one component in the .documentary/index.jsx file, that will construct a footer.
/**
 * The footer for documentation.
 */
export const footer = () => {
  const alt = 'idiocc'
  const src = 'https://avatars1.githubusercontent.com/u/40834161?v=4&s=100'
  const href = 'https://www.artd.eco'
  const org = 'Art Deco™'
  const year = new Date().getFullYear()
  return [
    (<table>
      <tr>
        <td>
          <img src={src} alt={alt} />
        </td>
        <td>
          © <a href={href}>{org}</a> {year}
        </td>
      </tr>
    </table>),
  ]
}
The avatar src and org names should automatically be updated with values that were specified in the MNP settings. This simple component will print a table with the picture of the organisation, its name, and year. This example can be used to create own components. Some more advanced examples include Splendid (static website compiler) component that is used to print how compiled HTML code looks like, by importing the function that generates HTML from the source code, and passing properties and children of the component to it. You can study it from Splendid's repo.
By writing components for our complex software, we can avoid having to run a development server and copying and pasting generated example HTML, which is neither scalable nor reliable since our examples might break. By automating the process of documentation with custom components, we not only save a lot of time, but provide a robust mechanism to keep examples up-to-date and make sure that what we discuss in examples actually works. Therefore when documenting code, you might want to take 5 minutes to write a component that will format the output to your liking, that will in the end save hours of your time.The components receive properties parsed from HTML when used in markdown/html files as strings, numbers or booleans. There's also the documentary property that can be accessed to disable pretty printing. NodeTools uses Preact 8 for its hyperdom functionality, but the components are rendered statically therefore they don't have state. Any component can return strings, JSX nodes or an array of the above (like fragments, but because Preact 8 doesn't support <> fragments syntax, you can simply return an array). The following functions are available on the documentary property:
export const mycomponent = ({ documentary }) => {
  // disable pretty printing (including new line breaks)
  documentary.pretty(false)
  // render inner html that might include new components
  // 1st argument: doRender, is whether to render children
  // 2nd argument: recursion, is whether components with the
  //               same name will render again
  documentary.renderAgain(true, false)
  // prints error message with component name
  documentary.error('message')
  // if the component doesn't print anything,
  // this method will return null and remove
  // the line from the output
  return documentary.removeLine(false)
}
Typedefs
The types are embedded with the typedef component. A special case is when typedef is called with method property, which will print a heading with the description of an API method from types, for example:
<typedef method="examplePackage" [noArgTypesInToc]>
  types/api.xml
</typedef>
will produce a heading and description of the method, and include it in the table of contents (when the noArgTypesInToc attribute is set, argument types won't appear in the TOC to make it more readable). The generated HTML will look like the following:
## <code>async <ins>examplePackage</ins>(</code><sub><br/> `config: !Config,`<br/></sub><code>): <i>string</i></code>
An example package created with MNP.
- <kbd><strong>config*</strong></kbd> <em><code><a href="#type-config" title="Options for the program.">!Config</a></code></em>: The config.
Such headings can be customised, as discussed in Wiki. The default implementation can be referred to also. When implementing custom methods' headings, the new component will replace the default one.
To embed types for configs and interfaces, the standard typedef is used:<typedef [narrow] [name="TypeName"]>types/index.xml</typedef>By default, a markdown table is generated which is suitable for simple configs. When dealing with more complex types, that might include tripple-backticked source code, the narrow property must be set which will generate a proper HTML table. A type name can be given to only embed a single type instead of all types in the XML file.
Namespaces
The types are written using namespaces, and the convention is to start the namespace with _ underscore. Namespaces allow to eliminate conflicts between types in packages. The doc script is set to the following: doc -o README.md -n _examplePackage -a -d. The root namespace is thus set to _examplePackage so that this namespace will not be shown in the documentation, but if the namespace is different, it will be printed.
Namespaces are not compulsory and might be a new feature that you've not made use of before, however they help in the process greatly. For very simple packages, the namespace can be removed, but that would require to remove the -u flag from typal jobs, as well as removing the namespace arg from markers like /* typal types/index.xml namespace */ in typedefs.Annotations
When generating documentation and Wikis, all types that were referenced in the documentation will be accumulated and written in typedefs.json file that is published with the package.
{
  "_examplePackage.examplePackage": {
    "link": "https://github.com/idiocc/example-package#async-examplepackageconfig-config-string",
    "description": "An example package created with MNP."
  },
  "_examplePackage.Config": {
    "link": "https://github.com/idiocc/example-package#type-config",
    "description": "Options for the program."
  }
}
Information from typedefs.json file can be used when generating documentation of other packages, but they need to be embedded with <include-typedefs>example-package</include-typedefs> component. Documentary will then resolve the typedefs field from the package.json of the referenced package ("typedefs": "typedefs.json") and read the typedefs file. It will store the link and description of the type, and use this fields for links to external pages, and title attributes for such links that show up on hover.
Wikis
If you answered yes to the question of whether to generate Wiki pages or not and then created a new Home Page for the new package, you'll be able to compile Wiki pages into the wiki.git folder which is automatically installed as git submodule. To add a submodule is the most convenient way to maintain wiki pages in the same project. Your pages from the wiki dir will be compiled into the wiki.git folder, and you need to push them separately from the main repo.
Watch Mode
The push process both for wikis and and README can be automated with -p [commit message] command that will observe changes to the source documentation files, update them and the output in the git tree, and force push over the same commit with the same message that was specified under the -p tag.

Context Testing
A context is a class that can be used across test cases. Its main purpose is to separate testing utilities from test cases: by placing all code that is required to set up tests in a separate files, we can keep test suits clean of the noise, yet access the testing API easily and in the most developer-friendly way.
// test/context/index.js
/**
 * A testing context for the package.
 */
export default class Context {
  async _init() {
    LOG('init context')
  }
  /**
   * Example method.
   */
  example() {
    return 'OK'
  }
  /**
   * A tagged template that returns the relative path to the fixture.
   * @param {string} file
   * @example
   * fixture`input.txt` // -> test/fixture/input.txt
   */
  fixture(file) {
    const f = file.raw[0]
    return join('test/fixture', f)
  }
  async _destroy() {
    LOG('destroy context')
  }
  static get BIN() {
    return BIN
  }
}
By providing JSDoc for documentation, the methods can be accessed via destructing in tests. Using context testing, we can always see what variables and functions are available to us from the testing context. It also allows to create as many files with test suites as we need without having to repeat ourselves when writing setting up and tearing down routines in before, beforeEach, after and afterEach blocks.
Snapshots
Tests can simply return a string value which will be recorded in a snapshot in the test/snapshot dir. Moreover, a readable stream can also be returned, and Zoroaster will collect all data returned from the stream and then compare it to the snapshot.
import erte from '../../src'

/** @type {TestSuite} */
const T = {
  async 'returns a string in colour'({ string }) {
    const res = erte(string, 'yellow')
    return res
  },
}

export default T

/**
 * @typedef {import('../context').TestSuite}
 */
If exporting a default test suite, we need to create a variable first and annotate it with type information, and export it as default only after, because VS Code will not be able to assign types to default exports. We import the TestSuite type from the context, which already created a nested structure that would allow to annotate test suite objects:
/** @typedef {Object<string, Test & TestSuite0>} TestSuite */
/** @typedef {Object<string, Test>} TestSuite0 */
/** @typedef {(c: Context)} Test */
If you're using multiple contexts, you'll need to create your own test suite signatures, but the main idea is that a test suite is of type Object<string, (c: Context, [c2: Context2, [c3: Context3]])>. This typedef can be defined in the context and then imported in test suites, or test suites files themselves.
Mask Testing
A mask is a test case template that has fixed logic but whose test input and output data is read from a separate file called mask result file. Therefore, we can set up a test case once, but repeatedly run it for multiple inputs that are mapped against outputs, so that we only have to add new mappings in the result file, without having to repeat the JavaScript logic.
// test/mask/default.js
import makeTestSuite from '@zoroaster/mask'
import Context from '../context'
import examplePackage from '../../src'

export default makeTestSuite('test/result/default', {
  /**
   * @param {Context} ctx
   */
  async getResults({ fixture }) {
    const text = fixture`test.txt` + `\n${this.input}`
    const res = await examplePackage({
      text,
    })
    return res
  },
  context: Context,
})
We use the @zoroaster/mask method to create a test suite which is then exported either as default or named export. Zoroaster context testing framework relies on ÀLamode, when -a flag is passed, so that like Documentary, it supports modules natively. The second argument to the makeTestSuite function is the configuration object, and we need to implement the getResults method (possibly asynchronous) that will run the test case and output the result. The result is that automatically compared against the declared one from the test result file. The input is read from the this.input variable.
The results are written in a separate file, in whatever most suitable file extension is, that supports syntax highlighting. Zoroaster supports .js and .md extensions from the box, where ## test name is used in markdown to indicate new tests, and // test name in JS files. The expected output is added in the /* expected */ block. This can be controlled from the splitRe option.## returns the correct output
test
/* expected */
test/fixture/test.txt
test
/**/
/* property */
["additional", "property"]
/**/
/* js-property */
{ hello: 'world' }
/**/Contexts are also available to be used in masks. Access to the API is made possible via the arguments to the getResults function, and any number of contexts can be passed. The makeTestSuite method is quite robust and supports many options, such as:
- getTransform: allows to return a Transform stream to be ended with the input specified in the mask's result.
- getReadable: allows to return a Readable stream constructed with the input from the mask.
- fork: configuration for fork testing (see below).
- mapActual: is the getResults returned a an object instead of a string, call this method to map which property of the object should be compared to the expected output.
- assertResults: additional assertions on results.
- jsonProps: properties that should be JSON-parsed (like above, /* property */ denotes a property which is exported in this.property property of the mask).
- js: properties that should be JS-parsed.
- splitRe: regular expression to split the result files by. The default is /^\/\/ /gm for results from all files, and /^## /gm for results from .md files.
- propStartRe: how to detect start of a property, e.g., in /⁎ propName ⁎/, the default /⁎ is used.
- propEndRe: how to detect end of a property, e.g, in /⁎ propName ⁎/ some prop value /⁎⁎/, the default /⁎⁎/ is used.
Fork Testing
NodeTools appreciates that powerful CLI applications can be written in Node.JS, however testing them has always been a chore. This is why Zoroaster is a powerful framework that provides a way to test forks automatically using mask testing. You can specify arguments to the program as inputs, and provide /* stdout */, /* stderr */ and /* code */ properties of the mask result file (each one is optional but at least one is required). The fork will be spawned and outputs compared to the ones supplied in the mask result.
## runs the binary
test/fixture/test.txt

/* stdout */
my-new-package called with a test file

a test file

/**/

/* stderr */
File test/fixture/test.txt successfully processed.
/**/
You can do a lot of cool things like passing inputs to stdin by specifying the inputs property:
## can register a domain
com

/* inputs */
Apply coupon: n
OK: y
/**/

/* stdout */
Apply coupon TLDEALZ01 (y/n)? [y] n

Price            8.88
Additional Cost  0.18
-----            --------
Total            9.06 USD

Registering DOMAIN using:
┌─────────────────────────────────────┐
│ John Zoidberg, zoidberg@futurama.bz │
│  Planet Express                     │
│  57th Street                        │
│  New New York                       │
│  10019, US                          │
└─────────────────────────────────────┘
OK (y/n)? [n] y
Successfully registered DOMAIN! Charged amount: $9.06.
/**/
More examples from Expensive.
The fork property of the mask constructor can accept a single path to the fork, or additional advanced options known as ForkConfig that allow to specify CWD, enable logging and others.Of course, contexts can be used for fork-testing too. This is useful, for example, when a CLI program needs to interact with an external web service, so that we can mock an HTTP server that serves responses. The example below will start a server using a context, and pass the url as the first argument to the CLI.
// mask
import clearr from 'clearr'

export default makeTestSuite('test/result/bin', {
  context: Context,
  fork: {
    module: Context.BIN,
    /**
     * @param {string[]}
     * @param {Context} context
     */
    async getArgs(args, { start }) {
      const url = await start({
        get: (ctx) => {
          // assign response from the response
          // property of the mask result.
          ctx.body = this.response
        },
      })
      return [url, ...args]
    },
    // use clearr package to remove
    // loading indicator w/ \r
    preprocess: clearr,
  },
  jsonProps: ['response'],
})
Or, we might want to make use of temp-context to ensure that data is written or read from a file by the CLI. The example below will write data from the mask result into a file using the write method of a temp context, and pass it as the first argument to the CLI whose job it is then to process this file in-place (the CLI updates the passed file). The spec in getResults is used to create a snapshot of the updated file using the context. The snapshot is returned for assertion on the /* expected */ property. In other words, we add some JS in the mask result, write it to a temp file, use CLI to update this temp file, then return the snapshot of the temp folder that includes the temp file, and compare it to the expected value. By specifying the context as param to functions, we receive full JSDoc support.
const TS = makeTestSuite('test/result/bin/default', {
  context: TempContext,
  fork: {
    module: Context.BIN,
    /**
     * @param {string[]} args
     * @param {TempContext} t
     */
    async getArgs(args, { write }) {
      const p = await write('program.js', this.program)
      return [p, ...args]
    },
  },
  /**
   * @param {TempContext} t
   */
  async getResults({ snapshot }) {
    return snapshot()
  },
})
More examples from Logarithm.
Persistent Contexts
In case when a certain long-running process (e.g., a connection to the database) needs to be initialised once per test suite, it's possible to assign it as a persistent context, rather than a one-use context.
export const testSuite = {
  persistentContext: class {
    async _init() {
      // initialised once per test suite
      // ...
      this.client = await client.connect('mongodb://localhost:27017')
    }
    async _destroy() {
      await this.client.close()
    }
  },
  context: [class {
    _init() {
      // initialised for each test
      // ...
    }
    async startServer(mongo) {
      return await start({ mongo })
    }
  }],
  'test case'({ client }, { startServer }) {
    const server = await startServer(client)
    const res = await get(server.url)
    equal(res.status, 200)
  },
}
Any number of contexts and persistent contexts can be passed, in an array, but persistent contexts will always be passed as arguments first. Read more about contexts on Zoroaster documentation.
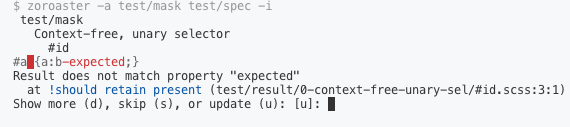
Interactive
Whether for masks or snapshot testing, when Zoroaster is run in the interactive mode with the -i flag, if the output was not what was expected, the testing framework will suggest that it should be updated (or new one recorded it there wasn't one before). This allows to quickly add expected outputs to masks.
Environments
You might have noticed that there are additional test scripts: test-build and test-compile which set the ALAMODE_ENV variable. This variable controls the renaming of imports via the .alamoderc file. It allows to run all test suites against compiled and build code, to make sure that not only source code is tested, but its derivatives prepared for publishing. When using Closure Compiler, it's pretty essential to run tests against the compiled version, because of the complexity of advanced compilation (e.g., it's possible we forgot to add a property to externs which then gets renamed so that the library does not work as expected).
{
  "env": {
    "test-build": {
      "import": {
        "replacement": {
          "from": "^((../)+)src",
          "to": "$1build"
        }
      }
    },
    "test-compile": {
      "import": {
        "replacement": {
          "from": "^((../)+)src$",
          "to": "$1compile"
        }
      }
    }
  }
}
The renaming is done using simple regexes. When testing compiled folder, we can only test those files exported from the main src file, i.e. from ../src but not ../src/lib because there's only one compiled file produced. Therefore the renaming is only possible with src$ regex that will rename imports exactly from src. With the build environment this is not the case and we can unit test everything.
When we test forks, the renaming doesn't work since we're hard-coding the location of the executable fork file, rather than importing it. Therefore, we need to manually control this path, which is done in Context:class Context {
static get BIN() {
return BIN
}
}
let BIN = 'src/BIN'
if (process.env.ALAMODE_ENV == 'test-build') {
console.log('Testing build bin...')
BIN = 'build/bin/mnp'
} else if (process.env.ALAMODE_ENV == 'test-compile') {
console.log('Testing compile bin...')
BIN = 'compile/bin/mnp'
}By adding a single logging line with the information about the location of the fork, we can make sure that our set up is correct.

Debugging
Debugging is an very important process and must be approached seriously. Professional software engineers always debug their programs with a debugger, rather than by leaving console.log statements as it saves a lot of time and allows to set through code line by line observing changes to variables.
To start debugging, we need an entry point, i.e. a program that is using our written source code. There are 2 candidates for this: either tests, or examples. The best IDE for debugging is VS Code that allows to open file being debugged in write-mode, and make changes on-the-fly. Therefore, we've included the configuration necessary for debugging in VS Code called launch.json and it's found in the .vscode folder. Don't be afraid to create as many records in the configs as you need, and commit them to remote repository. Configs are free and even if you and members of your team don't use same configs, it's better to still have them rather than having to create new ones each time because they were not committed to source control.{
{
"type": "node",
"request": "launch",
"name": "Launch Zoroaster",
"program": "${workspaceFolder}/node_modules/.bin/zoroaster",
"env": {
// "NODE_DEBUG": "my-new-package",
},
"console": "integratedTerminal",
"args": [
"test/spec",
"test/mask",
"-a", "-w", "-t", "9999999"
],
"skipFiles": [
"<node_internals>/**/*.js"
]
},
{
"type": "node",
"request": "launch",
"name": "Launch Example",
"program": "${workspaceFolder}/node_modules/.bin/alanode",
"console": "integratedTerminal",
"args": [
"example"
],
"skipFiles": [
"<node_internals>/**/*.js"
]
}
}
The configurations will launch either zoroaster or alanode binaries. By skipping node internals, we won't be jumping into Node's own source code, like fs.createReadStream('path') or async hooks that are executed after async operations. ÀLaNode is a simple binary that calls the ÀLaMode require hook to enable transpilation of modules. You can also call it directly like yarn alanode example/src.js to run examples or any scripts that you have.
Using VS Code interface, we set breakpoints by clicking on the line where we want to stop, either in the source code or in tests/examples. It's also possible to simply write debugger statement in code manually. Then we launch the compiler (F5) which will pause at the breakpoint. We can then hover over variable names, and observe their values and call stack on the left. Zoroaster will be started in watch mode, so that every change will rerun tests (you'll need to unpause the debugger first if it paused on a breakpoint) without having to restart the debugger.

Summary
NodeTools provides a holistic approach to pure Node.JS development and allows to maintain types without being locked in into TypeScript. Firstly, we can spawn packages quickly using GitHub templates via MNP. Then, by keeping types in XML files, we can generate externs for the compiler and typedefs for development purposes using Typal and also place types' tables and methods' headings in documentation. Examples and their output can also be placed into documentation which is put together by Documentary: this method provides an additional quality assurance control.
Context-testing is used for perfect developer experience during quality assurance that allows to reuse testing infrastructure across files easily via destructuring in test cases. Developers now can quickly glance at available testing API methods and access their JSDoc via the context. Destructured methods are already bound to instances of a context so they don't loose their scope like they would under normal circumstances:class Example {
constructor() {
this.hello = 'world'
}
method() {
return this.hello
}
}
const e = new Example()
const { method } = e
const res = method() // undefined, not found
export const testSutie {
context: Example,
async'test case'({ method }) {
return method() // 'world', as method is bound
}
}Additionally, test contexts can be reused across packages, like temp-context for system IO testing or @contexts/http for HTTP server testing. These are just 2 examples of contexts that were published to be simply required in other packages that need such testing utilities, and any developer can make their own context that will improve productivity of the whole ecosystem. Moreover, Zoroaster testing framework is a simple yet advanced tool that introduces mask testing: a QA method that allows to set up a blueprint for test cases once (a mask), but feed multiple input/output pairs into it from a separate file (called mask result). Since mask results are placed in their own files of arbitrary extension, our dev experience is again improved by proper syntax highlighting. Zoroaster also has a powerful fork-testing built-in feature that makes testing forks a breeze. By using different environments, we are able to test not only the source code but the compiled or built code too.
All of the above use ÀLaMode, the simplest regex-based transpiler that only updates imports into common-js modules understood by Node.JS of lower versions. Now we don't need to install thousands of unknown dependencies and relinquish control of our node_modules folder to have the essential stack required for productive Node development in 2020 with only 10 new folder in node_modules.The introduction of the compiler into the Node.JS development methodology via NodeTools is the best feature of the stack that allows to statically link packages and reduce the number of dependencies to 0. However, that requires most consumed dependencies to be compiler-compatible, e.g., characterised by such features as the externs field in package.json. Externs is a file that describes types for Closure Compiler in specially formatted JSDoc to prevent property names renaming during advanced compilation. Depack has provided externs for Node 8 built-in modules, such as fs.readFileSync, stream.createReadable, etc to enable type checking, however newer APIs might have been added to later versions (10, 12+). At the moment missing methods can be described manually in types/externs.js files: simply add the missing property or method on the namespace, like so:
/* typal types/index.xml externs */
// generated externs

/**
 * @param {string} path
 */
fs.node10Method = function(path) {}
Admin
If you want to make any changes to the package structure, you can simply fork the mnpjs/package template, and update any part of it (such as eslint config) to your preference. Then simply push it to GitHub and specify it as the default template in the .mnprc setting inside of the project or home directory. You can also study the mnp/index.js script inside the template to find out how to create your own templates for MNP.
The source code for all packages (except for templates which are MIT) is published under the AGPL license, however because the tools are used to facilitate the development process, and packages made with them don't link to them in any way (except if your package calls ÀLaMode require hook from source at runtime which it won't unless you explicitly do that, like Documentary does for JSX support), you don't have to publish the source code of your packages according to AGPL. Only if you build new software upon those packages that this needs to be done, but we don't expect you too. Please file any issues in both target package and NodeTools repo itself.

Examples
There are a number of packages that were created using NodeTools stack. For references to actual packages you can explore the following:

Comments